Nails with ribbon design have officially become one of the most searched manicure styles of 2026, and once you see even one well-done ribbon set, you understand why. This look has moved far beyond simple bow stickers. It now spans everything from hand-painted criss-cross ribbon lines to sculpted 3D gel ribbons that sit right on top of the nail like a tiny wrapped gift. Whether you are a complete beginner or someone who already does their nails at home regularly, this guide covers every style, every tool, and every mistake worth avoiding.
Why Nails With Ribbon Design Are Trending Right Now
The ribbon nail aesthetic did not come out of nowhere. It connects directly to the coquette and balletcore movements that dominated fashion runways in 2024 and 2025, and those aesthetics have firmly planted themselves in nail culture too.
At its core, the coquette nail aesthetic features soft pastel color palettes with pink leading the way, adorable mini bows and ribbon details, dainty hearts, pearls, and lace-inspired elements, all finished with a high-shine glossy coat. For more styles in this aesthetic, explore DailyFeedia’s trendy nail ideas for 2026.
What makes ribbon nails different from a simple bow design is the structure. A ribbon design usually involves lines, wraps, or layered elements that mimic how a real ribbon would look tied around a gift. It feels more intentional, more styled. And right now, that is exactly the energy people are going for.
By 2026, the classic soft ribbon aesthetic has evolved into something even more striking. It has merged with metallic finishes and structural gels to create what the industry is calling the Cyber-Coquette look, where romantic ribbon details meet high-tech chrome finishes.

Types of Nails With Ribbon Design You Should Know
Before picking up a brush, it helps to know what category of ribbon nail design you are actually going for. They are not all made the same way, and some require very different tools and skill levels.
Painted Ribbon Nails
This is the most accessible version. You paint ribbon-like lines directly onto the nail using a thin striping brush or a nail art liner. The design can be as simple as two diagonal lines crossing the nail to suggest a ribbon wrap, or as detailed as a full bow with loops, tails, and a center knot.
3D Ribbon Nails
The 3D ribbon bow creates a realistic ribbon texture using resin gel, often embellished with pearls for a soft luxurious finish. This style is more advanced and typically done with builder gel or acrylic, but press-on versions are widely available now if you want the look without the technique.
Criss-Cross Ribbon Nails
A criss-cross ribbon nail design creates the illusion of a ribbon crossing over the nail. This design is typically achieved using thin lines of nail polish and a steady hand. It looks intricate but is actually one of the more beginner-friendly ribbon nail styles once you practice the lines a few times.
Ribbon Wrap Nails
This style uses actual physical ribbon material applied onto the nail surface with nail glue. You gently press the ribbon down and wrap it around the nail, securing it with nail glue, then trim any excess ribbon and apply a top coat to seal everything in.
Ribbon French Tip Nails
A ribbon-inspired French tip involves painting the nails in a neutral shade and then creating a thin ribbon design along the tips, with glitter polish or metallic accents used to elevate the look further. For more variations on this classic manicure, see nail inspo French tip for women and white French tip nails with design.
Best Nail Shapes for Ribbon Designs
Not every nail shape works equally well for ribbon art. The shape affects how the lines read and how much surface area you have to work with.
Almond nails are arguably the most flattering for ribbon designs because the tapered tip naturally guides the eye upward and makes vertical ribbon lines look elegant. Simple coquette ribbon nails prove that a single well-placed detail on a clean base does the job without needing elaborate 3D work or ten different design elements.
Coffin nails offer a wide flat surface which is perfect for horizontal ribbon wraps or more complex layered bow designs. Oval nails work well for minimalist ribbon accents because they keep everything looking soft and feminine. Even short nails can carry a ribbon design beautifully. Creating a criss-cross ribbon nail design on short nails is entirely possible but may require more precision and patience.
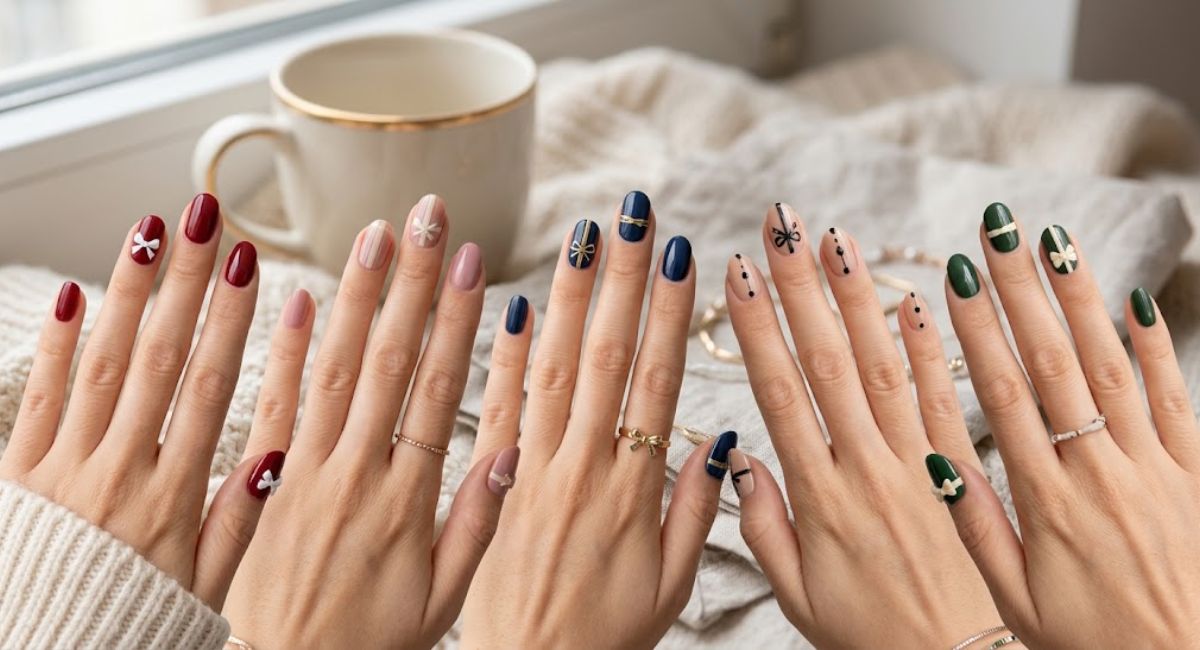
Colors That Work Best for Nails With Ribbon Design
Color choice makes or breaks a ribbon nail look. Here are the combinations that consistently work:
Blush pink with white ribbon lines. This is the most classic ribbon nail pairing. It reads feminine and soft without being overwhelming. Use a sheer milky pink base and draw white ribbon lines across it for a clean, editorial finish.
Red with gold ribbon accents. This combination works especially well for holiday ribbon nail designs. The classic Christmas interpretation is red ribbon nails finished with a gold bow, and it remains a top-requested design for the festive season. For another ribbon-inspired color variation, take a look at DailyFeedia’s blue ribbon nails for women.
Black base with satin silver ribbon. This is for anyone who wants a darker, moodier take on the trend. It fits the dark coquette aesthetic and pairs well with silver charms or pearl accents.
Nude base with metallic ribbon. This option is the most versatile for everyday wear. The nude base keeps things neutral while the metallic ribbon adds the decorative element without being loud.
Pastel purple with lavender ribbon. An underrated combination that photographs beautifully and stands out from the typical pink options.

Step-by-Step Tutorial: Painted Ribbon Nail Design for Beginners
This method does not require any special tools beyond a thin striping brush and two nail polish colors.
What you need:
A base coat, your chosen base color polish, a contrasting color for the ribbon lines, a thin nail art brush or striping brush, and a glossy top coat.
Step 1: Prep your nails properly.
File your nails into your desired shape and push back the cuticles gently. Remove any old polish and make sure the nail surface is completely clean and dry. Apply one thin layer of base coat and let it dry fully before moving on.
Step 2: Apply your base color.
Paint your nails with the base color. Two coats are usually needed for even coverage. Let each coat dry before applying the next. Rushing this step is the most common reason designs smudge or look uneven.
Step 3: Plan your ribbon placement.
Before you paint anything, decide where your ribbon lines will go. A basic ribbon design uses two diagonal lines starting from one corner of the nail and crossing toward the opposite side, with a small bow drawn at the intersection point.
Step 4: Draw the ribbon lines.
Dip your striping brush into your ribbon color and draw the first diagonal line across the nail. Keep the pressure light and move in one smooth stroke rather than dragging back and forth. Repeat on the other side. The lines should cross near the center or upper third of the nail depending on your preference.
Step 5: Add the bow or knot detail.
Where the lines cross, add a small circular dot or a tiny figure-eight shape to suggest a knot. For a fuller bow, add two small curved loops on either side of the knot. Keep the loops proportional to your nail size.
Step 6: Seal with top coat.
Apply a glossy top coat over the entire nail once the ribbon design has fully dried. This protects the design and gives the finished look a professional shine.

Common Mistakes to Avoid With Ribbon Nail Designs
Skipping the base coat. This one mistake leads to staining, chipping, and designs that peel within days. Base coat is not optional.
Using too much polish on the brush. A flooded brush produces thick, wobbly lines. Wipe most of the product off on the bottle rim before you draw anything.
Rushing drying time. Design smudging is usually caused by wet nail polish, so allowing the polish to dry completely before applying ribbons or drawing over it is essential.
Choosing ribbons that are too wide. If you are using real ribbon material, thin ribbons work far better on nails. Wider ribbons bunch up and look messy rather than sleek.
Forgetting to seal the edges. Run your top coat brush along the very edge of the nail to seal the design and prevent lifting.
3D Ribbon Nails: What to Know Before You Try
The 3D version of nails with ribbon design is stunning but it does require either builder gel or acrylic, plus the right sculpting tools. If you are doing this at home for the first time, practicing on a fake nail tip or a piece of cardboard taped to your finger first is genuinely worth doing before attempting it on your actual nails.
The standard starting point for the Cyber-Coquette 3D ribbon look is a sheer high-gloss base, typically a milky pink or nude BIAB (Builder In A Bottle) acting as the canvas. The 3D ribbon is then built directly on top using small amounts of gel, shaped while still soft, then cured under a UV lamp.
Pearl accents placed along the edges of the ribbon or at the bow’s center point add an elevated detail that takes the design from simple to genuinely impressive. The key to the coquette 3D ribbon style lies in its tactile quality and emotional value, with lace-inspired nail art and ribbon-like qualities creating designs that invite touch through transparency, fine detailing, and layered finishes. If you are still deciding on a base shade, browse these nail color ideas for women.

Ribbon Nail Designs for Every Occasion
Everyday wear: A single accent nail with a painted ribbon over a neutral base keeps things subtle and office-appropriate. Use a nude or blush base with a white ribbon line.
Date night: Go for a glossy red base with gold ribbon lines and a 3D bow on the ring finger. Add a crystal accent at the bow center for extra impact.
Wedding guest nails: Soft ivory or champagne nails with satin-look ribbon lines and pearl embellishments are elegant without overpowering a formal outfit.
Holiday nails: Classic Christmas ribbon nails in red with gold bow accents remain one of the most requested festive designs, and they suit almost any Christmas outfit.
Breast Cancer Awareness nails: Pink ribbon designs are a meaningful way to show solidarity, with options ranging from a subtle pink ribbon tip design to glitter ribbon styles for more visual impact.
Tools and Products Worth Buying
You do not need an expensive setup to do ribbon nail designs at home. These are the items that actually make a difference:
A thin nail art liner brush in size 00 or 000 makes drawing precise ribbon lines dramatically easier than using a standard brush. Nail striping tape creates perfectly straight lines for ribbon wraps without needing a steady hand. Nail glue is essential if you are applying real ribbon material. UV gel top coat gives a longer-lasting and shinier finish than regular air-dry top coat. A small dotting tool helps create the bow knot detail without it looking blobby.
For gel ribbon nails, brands like OPI, Beetles Gel Polish, and Modelones offer builder gels that are beginner-friendly and widely available.
Caring for Nails With Ribbon Design
A ribbon nail design lasts longer with a little maintenance. Reapply your top coat every two to three days to refresh the shine and protect the design from chipping. Keep your hands moisturized but avoid applying thick hand creams directly over the nail surface as they can dull the finish. When doing dishes or cleaning, wear gloves. Water exposure is the number one cause of lifted ribbon designs and early peeling.
If a ribbon line chips or smudges, do not try to touch it up with the same brush. Instead, clean the area, let it fully dry, and redraw just that element before sealing again with top coat.
FAQs About Nails With Ribbon Design
1. How long do nails with ribbon design last?
A painted ribbon design sealed with a good top coat typically lasts 5 to 7 days on natural nails. Gel ribbon nails can last 2 to 3 weeks with proper care.
2. Can beginners do ribbon nail designs at home?
Yes. Painted ribbon lines and criss-cross ribbon designs are beginner-friendly. 3D ribbon nails require more practice and usually gel or acrylic products.
3. What nail shape works best for ribbon designs?
Almond and coffin shapes show ribbon designs most clearly, but oval and even short square nails can carry a ribbon design beautifully.
4. What colors are most popular for ribbon nail designs?
Blush pink with white ribbons is the most popular combination. Red with gold is a close second, especially for festive occasions. Dark coquette fans often go for black with silver ribbon accents.
5. Do I need special tools for ribbon nail art?
A thin nail art liner brush is the most important tool. Striping tape also helps for clean lines. For 3D ribbon nails, you will need builder gel and a UV lamp.
6. How do I remove ribbon nail designs?
Painted ribbon designs come off with regular nail polish remover. Gel ribbon nails require soaking in acetone. Physical ribbon material glued to the nail can be soaked off or gently lifted after acetone softens the glue.
7. Can I do ribbon nail designs on short nails?
Absolutely. Simpler ribbon designs like a single diagonal line or a small bow accent work well on shorter nails. The key is keeping the design proportional.
8. Are ribbon nail designs the same as bow nail designs?
They overlap but are not exactly the same. Bow nails focus on the bow shape specifically. Ribbon nail designs include the full ribbon wrap, criss-cross lines, and other ribbon-inspired elements in addition to the bow.
9. What is the cyber-coquette ribbon nail trend?
It is a 2026 evolution of the classic ribbon nail look, combining feminine ribbon elements with metallic and chrome finishes for a futuristic aesthetic.
10. How do I make my ribbon nail design last longer?
Reapply top coat every two to three days, wear gloves when cleaning, keep nails moisturized, and avoid peeling or picking at the design.