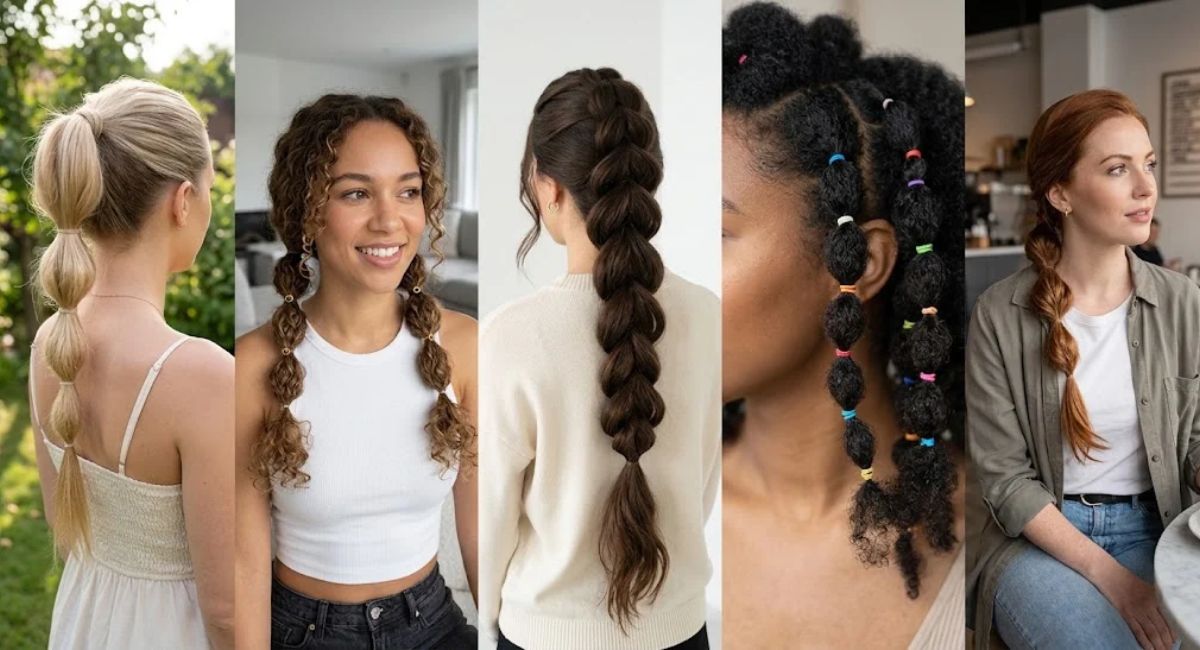
Bubble braid hairstyles are having a serious moment right now, and honestly, they deserve every bit of the hype. What started as a simple ponytail trick has turned into one of the most versatile, playful, and genuinely wearable hairstyle trends across hair types and lengths. Whether you have pin-straight hair, natural coils, or somewhere in between, bubble braids work. And the best part? You do not need any actual braiding skills to pull them off.
This guide goes deeper than the basics. You will find the full step-by-step, every major variation worth trying, tips that competitors miss, and honest advice on what actually makes this style hold.
What Are Bubble Braid Hairstyles, Really?
Bubble braids are a hairstyle where sections of hair are tied off with elastics at regular intervals, creating a series of puffy “bubbles” along the length of the braid. Technically speaking, no braiding is actually involved. The ponytail is split into sectioned bubbles with elastics, and “bubble braid” is simply the more widely recognised name.
The look is deceptively simple. Spaced elastics create volume, and when you gently pull the hair between each one outward, you get those rounded, full sections that give the style its name. It is breezy enough for a gym session and polished enough for a wedding guest look, depending on how you finish it.
Tools You Actually Need (Keep It Simple)
One mistake people make is overcomplicating the prep. You do not need a salon-level kit. Here is what works:
Start with soft hair ties or elastics to avoid breakage. A fine-tooth comb helps detangle before styling. Hairpins can secure loose strands or add extra volume at certain sections. A light-hold hairspray keeps everything in place without stiffening the hair.
A texturizing spray is genuinely useful too. It adds grip so the bubbles hold their shape without slipping. Think something like Bumble and bumble Thickening Spray or Color Wow’s Style on Steroids. Avoid thick creams before styling because they make the hair too slick for the elastics to grip.
How to Do Bubble Braid Hairstyles: Step by Step
Step 1: Prep Your Hair
Before you start styling, make sure your hair is clean and dry. Apply a heat protectant if you are using any heated tools. Detangle with a wide-tooth comb to remove knots gently.
Bubble braids on wet hair do not hold their shape, so always start with dry hair. A smooth, dry base gives you the cleanest separation between each bubble.
Step 2: Create Your Base Ponytail
Gather your hair into a high ponytail if you want the most dramatic bubble effect. A low or mid ponytail works too and gives a softer, more relaxed result. Secure with one elastic at the base.
A high ponytail at the crown of the head creates the most dramatic bubble effect.
Step 3: Add the Bubble Elastics
Place your second elastic about two to three inches below the first. The distance between elastics determines the size of each bubble. Closer together means smaller, tighter bubbles. Further apart gives you big, dramatic ones.
Repeat this down the length of your ponytail, spacing each elastic as evenly as you can.
Step 4: Create the Bubble Effect
Gently pull the hair between the elastics outward to form a rounded bubble. Pull each bubble out evenly for a rounded, consistent shape. Make the final bubble slightly smaller for balance.
For added volume, lightly backcomb each bubble from the underside before shaping. This is a small trick most tutorials skip, but it makes a noticeable difference, especially on finer hair.
Step 5: Lock It In
Finish with a light mist of hairspray, not a heavy coat. You want hold without crunch. Tuck any stray hairs with bobby pins and you are done.
7 Bubble Braid Hairstyle Variations Worth Trying
1. Classic Bubble Braid Ponytail
The high bubble ponytail is easily the most straightforward bubble braid style. It suits nearly every occasion and takes under ten minutes. Great starting point if you are new to the look.
2. Double Bubble Braids
Two bubble braids instead of one, sitting on either side of your head. It features two flat bubble braids going straight to the back, with each braid taking up about half of your head. It may look intimidating but it is actually quite simple. These work especially well on thicker hair and bring serious Y2K energy.
3. Half-Up Half-Down Bubble Braid
Divide the top half of your hair and create a bubble braid on that section while leaving the rest of your hair down. This is a go-to for anyone who wants the bubble braid look without committing to a full updo. It reads effortlessly elegant, especially with loose waves left down.
4. Dutch Bubble Braid
Start with a Dutch braid at the crown, then transition into the elastic-and-bubble technique further down. A Dutch bubble braid adds depth and dimension that a plain ponytail version simply cannot achieve. This one takes slightly more effort but photographs beautifully.
5. Single Straight-Back Bubble Braid
A single straight-back bubble braid extends from the front of your head to the nape of your neck and hangs down your back. It is a sleek, athletic look that works great for workouts or busy days when you want your hair fully off your face.
6. Bubble Box Braids
Bubble box braids combine the protective style of box braids with the bubble braid technique, creating a textured, voluminous look that can last for days. This variation is popular for natural hair and protective styling.
7. Accessorised Bubble Braid
Thread ribbons, pearls, or thin chains through the centre of each bubble. Personalise your bubble braid by adding accessories like ribbons or beads for extra flair. For weddings or formal events, pearl-tipped pins tucked into each bubble create something genuinely stunning.
Bubble Braids for Different Hair Types
Fine or Thin Hair
Backcombing inside each bubble before you pull it out is not optional here. It is necessary. A texturising spray at the roots before you start also helps the style look fuller. Smaller bubbles spaced closer together tend to look better on fine hair because they create density.
Thick Hair
Thick hair holds the bubble shape naturally and gives the most voluminous result. You may need to use more elastics and pull each bubble out a little more conservatively, since over-pulling on thick hair can look too messy.
Curly or Coily Hair
Bubble braids on curly hair work with most curl types. The basic technique applies with the added benefit of natural texture making each bubble look fuller with less effort.
For coily hair, partial bubble braids, pulling just the top half into a small bubble pony and leaving the rest down, is a great option if your length is not quite long enough for a full ponytail version.
Short Hair
Shorter lengths can still get in on bubble braids. Tips for short bubble braids include trying partial styles or using extensions to add length. A half-up bubble braid on shorter hair actually looks incredibly chic and requires minimal length.
Using Extensions for Bubble Braids
Bubble braid styles look best when they are voluminous and thick. If your natural hair is not giving enough volume, extensions are a straightforward fix. No matter what bubble braid style you are doing, the process for adding extensions is roughly the same. You choose how much hair to add and then loop an elastic around its midpoint, using that same elastic to attach the extensions to the base of the bubble braid.
Extensions add length and fullness, which makes each bubble look rounder. Clip-ins work well for a one-day look. For something that lasts longer, braiding in wefts is a cleaner approach.
Common Mistakes to Avoid
Pulling bubbles unevenly. If one side of the bubble is puffier than the other, the whole style looks off. Take a second to check each bubble from the front before moving to the next one.
Using the wrong elastics. Thick scrunchies do not grip enough to hold the bubble shape. Thin, clear elastics are almost always the better choice. Thick scrunchies do not grip enough to hold the bubble shape.
Skipping texturising spray. This is the single thing that separates a flat, forgettable bubble braid from one that looks full and deliberate. Even one light pass over the ponytail before you start makes a difference.
Making all the bubbles the same size. A small taper toward the end, with each bubble slightly smaller than the one above it, makes the overall shape look more intentional and polished.
How Long Do Bubble Braids Last?
Most bubble braids look fresh for one full day. Generally, you can expect your bubble braid style to last anywhere from a few days up to a week if you sleep carefully and use a silk or satin pillowcase to minimise frizz. Touch-ups in the morning are quick because you only need to re-fluff each bubble, not redo the whole style.
Use strong elastics and shape each bubble carefully as you go to maximise how long the style holds.
Styling Tips That Actually Make a Difference
A few things the basic tutorials tend to leave out:
Mist your hair before pulling bubbles. A light spritz of water or a flexible hold spray before you start pulling each section out makes the hair more pliable and reduces frizz while you work.
Work from the bottom up when fluffing. Most people pull bubbles out from the top down, but starting at the bottom first and working upward gives you better control over the final shape.
Do not skip the tail. The very end of your bubble braid, the bit below the last elastic, often gets ignored. Curling it slightly or adding one last small elastic with a small tail of hair left loose gives the whole style a more finished look.
Photograph it before you go out. Bubble braids photograph beautifully from the side and from behind. Take a moment to check the silhouette because sometimes what looks slightly uneven in a mirror looks great in a photo, and vice versa.
Who Can Wear Bubble Braid Hairstyles?
Bubble braids can be customised in a number of ways to suit different hair types and lengths. There is genuinely no hair type this style does not work on, which is rare. The technique scales up or down based on what you are working with. Fine hair gets texture. Thick hair gets shape. Curly hair gets definition. Natural hair gets a protective option that still looks styled.
Bubble braids are a versatile and stylish way to wear your hair whether you have curly, straight, or natural hair. Age is not a factor either. The style reads playful or sophisticated entirely based on how you finish it and what you are wearing.
FAQs
1. Are bubble braids hard to do on yourself?
Not at all. They are one of the easier hairstyles to DIY because there is no actual braiding involved. If you can make a ponytail, you can do bubble braids.
2. Do bubble braids work on short hair?
Yes, though the style works best with enough length to create at least two or three bubbles. A half-up version works great on shorter lengths.
3. Can I do bubble braids on natural hair without heat?
Absolutely. Natural hair often holds the bubble shape better than straight hair because the texture adds grip. No heat required.
4. What kind of elastics are best for bubble braids?
Thin, clear elastics are the standard choice. They grip well without leaving marks and blend into most hair colours.
5. How do I add volume to bubble braids?
Lightly backcomb each section before pulling it outward. Texturising spray before you start also helps significantly.
6. Can bubble braids damage your hair?
They can if the elastics are too tight or left in for too long. Use soft elastics, avoid over-tightening, and take them out gently to minimise breakage.
7. How do I make bubble braids last overnight?
Sleep on a silk or satin pillowcase and loosely wrap the style in a satin scarf. In the morning, gently re-fluff each bubble with your fingers.
8. Are bubble braids protective for natural hair?
They offer some protection since the hair is tucked and secured, but they are not as protective as fully enclosed styles like box braids or twists. Moisturise your hair well before styling.
9. What is the difference between a bubble braid and a bubble ponytail?
They are the same thing. “Bubble braid” is the more popular search term even though no braiding is technically involved.
10. Can I wear bubble braids to a formal event?
Yes. Add small pearl pins, thin ribbons, or delicate chains to each bubble and the style becomes genuinely elegant for weddings, galas, or formal occasions.